
Part.1에서는 코드푸시란 무엇이고 왜 사용하는지, 어떤 원리로 동작하는지 등에 대해서 알아보았습니다. Part.2에서는 본격적으로 코드푸시를 어떻게 사용할 수 있는지 그 방법에 대해서 다뤄보겠습니다. (Part.1 : https://dong-x2.tistory.com/9?category=1062440 )
Code Push를 이용한 React Native 인앱 업데이트 Part.1
회사에서 React Native로 개발을 하며 사소한 업데이트나 긴급한 hotfix의 경우 마켓 심사를 거치지 않고 바로 사용자에게 변경사항을 반영하고 싶다는 기획의 요청이 있어서 이에 대응하기 위해 Micr
dong-x2.tistory.com
실제 운영중인 앱에 코드푸시 기능을 넣으면서 여러모로 헤맨 기억이 있는데 저처럼 코드푸시 기능 탑재를 처음 하시는 분들을 위해 최대한 Step by step으로 따라오실 수 있게 설명드려보겠습니다.
1. AppCenter 및 AppCenter CLI 설정
1-1. AppCenter 회원가입
Microsoft AppCenter( https://appcenter.ms/ )에 회원가입을 합니다. 토이프로젝트이던 회사에서 실제 운영할 개발건이던 협업으로 프로젝트를 운영할 경우엔 관리자용 계정을 하나만 생성하고 그 계정을 공유하며 접근하는 것이 간편합니다.
1-2. AppCenter CLI 설치
yarn global add appcenter터미널에서 위 명령어를 통해 AppCenter CLI를 설치해줍니다. 반드시 global로 설치해야하며, 사전에 node.js가 설치되어있어야 합니다.
1-3. AppCenter CLI 로그인
appcenter login터미널에 명령어 입력시 뜨는 브라우저에서 AppCenter에 로그인을 하면 토큰을 주는데 해당 토큰을 터미널에 입력하면 됩니다. (추후 배포 절차에서도 터미널 재부팅시 항상 이 로그인을 해주어야하기 때문에, 브라우저에서 AppCenter에 자동로그인 하도록 설정해두면 편합니다.)
로그인된 사용자 확인은 appcenter profile list , 로그아웃은 appcenter logout 명령어를 통해 가능합니다.
1-4. AppCenter에 앱 등록
appcenter apps create -d <앱이름> -o <OS이름> -p <플랫폼이름>iOS와 Android를 각각 다른 앱으로 따로 등록해야합니다. 이 과정은 AppCenter 웹페이지에서 GUI로 진행해도 되지만 CLI로 명령어를 통해 등록하는 것이 추후에 안정적입니다. 예시는 아래와 같습니다.
appcenter apps create -d todo-app-ios -o iOS -p React-Native
appcenter apps create -d todo-app-aos -o Android -p React-Native
앱 최초 등록시 터미널에 Secret Key가 주어진다면 해당 Key를 안전한 곳에 메모해두면 좋습니다.
등록된 앱 조회는 appcenter apps list 명령어로 가능합니다.
1-5. 등록된 앱에 각 배포단계 추가
등록된 앱에 Staging과 Production의 배포 단계를 추가해주는 과정입니다. 이 과정은 앱 등록처럼 최초 1회만 하면 됩니다. 유저이름은 AppCenter의 계정 이름을 말합니다. ( appcenter profile list로 확인 가능 )
appcenter codepush deployment add -a <유저이름>/<앱이름> <배포단계이름>터미널에 각 배포단계별 Key가 주어진다면 해당 Key를 안전한 곳에 메모해두면 좋습니다. 위 명령어의 예시는 아래와 같습니다.
appcenter codepush deployment add -a frontDongdong/todo-app-ios Staging
appcenter codepush deployment add -a frontDongdong/todo-app-ios Production
appcenter codepush deployment add -a frontDongdong/todo-app-aos Staging
appcenter codepush deployment add -a frontDongdong/todo-app-aos Production
배포 상태를 확인하기 위해선 아래 명령어를 입력해주면 됩니다.
appcenter codepush deployment list -a <유저이름>/<앱이름>
1-6. 등록된 앱의 배포단계별 키 확인
여기서의 키는 배포를 하는 AppCenter의 앱과 실제 우리의 소스코드로 이루어진 앱을 연결시켜주는 Key이기 때문에 매우 중요합니다.
appcenter codepush deployment list -a <유저이름>/<앱이름> -k
2. React Native 클라이언트 SDK 설정
2-1. 라이브러리 추가
터미널에서 아래 두 명령어를 통해 코드푸시 사용에 필요한 라이브러리를 설치해줍니다.
yarn add code-pushyarn add react-native-code-pushyarn add appcenter-analytics appcenter-crashesiOS의 경우 이 명령어 실행 후 cd ios && pod install && cd .. 명령어를 입력해주는 것은 필수입니다.
2-2. 루트 컴포넌트 감싸기
App.tsx 와 같은 루트 컴포넌트 코드를 다음과 같은 형태로 만들어줍니다.
import codePush from 'react-native-code-push';
...
export default codePush(App);
3. iOS 세팅
3-1. AppCenter-Config.plist 파일 추가
AppCenter-Config.plist 라는 파일을 ios/<프로젝트이름> 디렉토리에 생성해줍니다. 그 파일의 내용은 아래와 같게 합니다.
<?xml version="1.0" encoding="UTF-8"?>
<!DOCTYPE plist PUBLIC "-//Apple//DTD PLIST 1.0//EN" "https://www.apple.com/DTDs/PropertyList-1.0.dtd">
<plist version="1.0">
<dict>
<key>AppSecret</key>
<string><SECRET_KEY></string>
</dict>
</plist>
<SECRET_KEY> 부분에 iOS 앱의 비밀키를 입력해줍니다. 비밀키를 모르겠다면 앱센터 GUI콘솔 첫화면에서 해당 앱(iOS)을 클릭해보면 알 수 있습니다.
3-2. AppDelegate.m 수정
ios/InanaApp/AppDelegate.m 파일에 다음 코드를 삽입합니다.
#import <AppCenterReactNative.h>
#import <AppCenterReactNativeAnalytics.h>
#import <AppCenterReactNativeCrashes.h>
#import <CodePush/CodePush.h>
그리고 didFinishLaunchingWithOptions 라는 함수 안에 다음 코드를 삽입합니다.
[AppCenterReactNative register];
[AppCenterReactNativeAnalytics registerWithInitiallyEnabled:true];
[AppCenterReactNativeCrashes registerWithAutomaticProcessing];
그리고 [[NSBundle mainBundle] URLForResource:@"main" withExtension:@"jsbundle"]; 코드를 지우고 해당 자리에 다음 코드를 삽입합니다.
return [CodePush bundleURL];
3-3. main.jsbundle 생성
이 과정은 아래 블로그중 한 곳을 참고하시면 됩니다. 과정 수행 후 프로젝트의 ios 디렉토리 내에 main.jsbundle 파일이 생성되어야 정상입니다.
https://blog.jell.kr/dev/js/tip/2020/09/27/jsbundle%EC%97%90%EB%9F%AC/
React native iOS의 .jsbundle에러 해결법
개요 오랜만에 React native 프로젝트를 다시 열 일이 있어서 초기화한 맥에 설치를 하고 앱을 실행해 봤습니다. 그런데.. 에러가 뜨면서 실행이 안되는 겁니다. 그래서 인생의 동반자스승인 구글신
blog.jell.kr
https://velog.io/@dody_/RN-%EC%97%90%EB%9F%AC%EB%85%B8%ED%8A%B8-main.jsbundle-does-not-exist-
[RN 에러노트🔥] main.jsbundle does not exist ...
음.. 이 에러가 어쩌다가 생긴지 기억이 안난다. 정신을 어디에 두고 다니는 건지 모르겠다..archive를 하려는데 자꾸 이 에러가 뜨는 것이다..해결방법이 생각보다 이리저리 돌아다녀 있는데 왜
velog.io
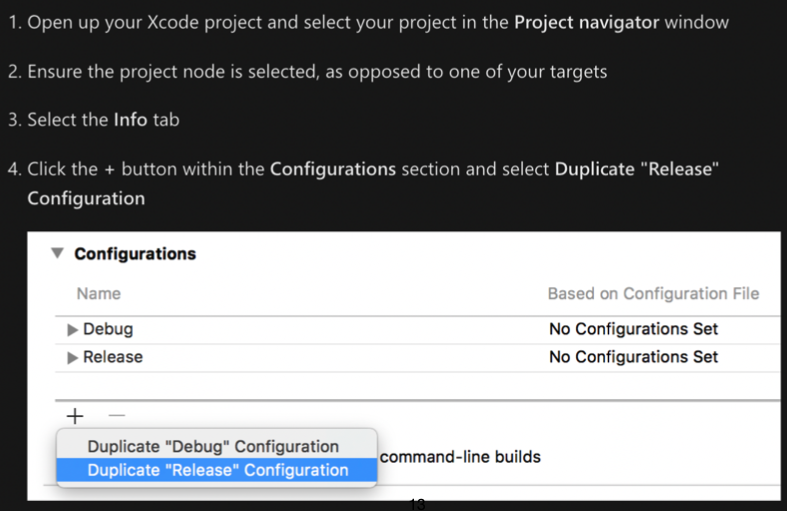
3-4. Info.plist 수정
아래 링크(Microsoft AppCenter 공식문서)에서 아래 이미지와 같은 부분을 끝까지 (1번부터 9번, 이미지에서는 4번까지만 나옴) 순차적으로 따라하며 info.plist 파일에 앱의 배포 key를 등록해주어야 합니다.
https://learn.microsoft.com/en-us/appcenter/distribution/codepush/rn-deployment#ios
Using the React Native SDK with CodePush – Distribution - Visual Studio App Center
Distribution with React Native SDK and CodePush
learn.microsoft.com
4. Android 세팅
4-1. android/app/src/main/assets/ 위치에 appcenter-config.json 파일 생성
위와 같은 위치에 해당 파일을 생성해줍니다. 파일의 내용은 아래와 같습니다. iOS에서와 마찬가지로 <SECRET_KEY> 부분에 Android 앱의 비밀키를 입력해줍니다. 비밀키를 모르겠다면 앱센터 GUI콘솔 첫화면에서 해당 앱(Android)을 클릭해보면 알 수 있습니다.
{
  "app_secret": "<SECRET_KEY>"
}
4-2. res/values/strings.xml 코드 추가
위 파일에 아래와 같은 코드를 추가해줍니다.
<string name="appCenterCrashes_whenToSendCrashes" moduleConfig="true" translatable="false">DO_NOT_ASK_JAVASCRIPT</string>
<string name="appCenterAnalytics_whenToEnableAnalytics" moduleConfig="true" translatable="false">ALWAYS_SEND</string>
4-3. android/settings.gradle 수정
위 파일의 include ':app' 부분을 아래 코드로 대체합니다.
include ':app', ':react-native-code-push'
project(':react-native-code-push').projectDir = new File(rootProject.projectDir, '../node_modules/react-native-code-push/android/app')
4-4. android/app/build.gradle 수정
위 파일에 아래와 같은 코드를 추가합니다. 단, 아래 코드중 이미 존재하는 코드가 있다면 없는 코드만 추가해주면 됩니다.
apply from: "../../node_modules/react-native/react.gradle"
apply from: "../../node_modules/react-native-code-push/android/codepush.gradle"
4-5. MainApplication.java 수정
android/app/src/main/java/.../MainApplication.java 파일에 아래 코드를 추가합니다.
import com.microsoft.codepush.react.CodePush;그리고 아래와 같은 이름의 함수 내부에 주석 아래부분과 같이 Override 함수를 추가해줍니다.
public class MainApplication extends Application implements ReactApplication {
    private final ReactNativeHost mReactNativeHost = new ReactNativeHost(this) {
        ...
        // 2. Override the getJSBundleFile method to let
        // the CodePush runtime determine where to get the JS
        // bundle location from on each app start
        @Override
        protected String getJSBundleFile() {
        	return CodePush.getJSBundleFile();
        }
    };
}
4-6. android/app/build.gradle 수정
위 파일의 buildTypes 부분에 아래와 같은 resValue관련 코드를 추가합니다. (내용이 있다면 있는 내용은 그대로 두어야합니다. signingConfig, signingConfigs.debug 등)
buildTypes {
    debug {
        ...
        resValue "string", "CodePushDeploymentKey", '""'
        ...
	}
    releaseStaging {
        ...
        resValue "string", "CodePushDeploymentKey", '"<INSERT_STAGING_KEY>"'
        matchingFallbacks = ['release']
        ...
    }
    release {
        ...
        resValue "string", "CodePushDeploymentKey", '"<INSERT_PRODUCTION_KEY>"'
        ...
    }
}
<INSERT_KEY> 부분은 각 배포 단계에 해당하는 KEY를 넣습니다. (따옴표들은 그대로 유지해야합니다.) 그리고 if (enableHermes) 블럭이 있다면 해당 블럭 마지막에 다음과 같은 코드를 추가해줍니다.
releaseStagingImplementation files(hermesPath + "hermes-release.aar")
5. 빌드 성공 확인
모든 SDK 설정은 마쳤다면, 빌드를 해보고 에러가 없는지 확인합니다. 이 때, 빌드캐시는 미리 지워주세요. 예를 들어 안드로이드 같은 경우 다음과 같은 명령어로 입력해 빌드 캐시를 지워줍니다.
cd android && ./gradlew clean && cd ..만약 에러가 있다면 마이크로소프트 앱센터 공식문서( https://learn.microsoft.com/en-us/appcenter/distribution/codepush/ ) 등을 참고하여 자신의 프로젝트와 세팅이 무엇이 다른지 확인이 필요합니다.
6. 루트 컴포넌트 코드푸시 설정 고도화
이전에 루트 컴포넌트(App.tsx)에서 작업했던 내용은 코드푸시의 디폴트 설정을 따라가게 됩니다. 이러한 동작을 자신이 원하는대로 세팅할 수 있는데 예시는 다음과 같습니다. 자세한 설정 변경은 앱센터 공식문서의 API 레퍼런스를 참고해주세요. ( https://learn.microsoft.com/en-us/appcenter/distribution/codepush/rn-api-ref )
function codePushSync() {
	codePush.sync({
		updateDialog: {
			title : "새로운 업데이트가 존재합니다.",
			optionalUpdateMessage : "지금 업데이트하시겠습니까?",
			optionalIgnoreButtonLabel : "나중에",
			optionalInstallButtonLabel : "업데이트"
		},
		installMode: codePush.InstallMode.IMMEDIATE
	});
}

...

useEffect(() => {
	codePushSync();
	AppState.addEventListener("change", (state) => {
		state === "active" && codePushSync();
	});
 }, []);
7. 배포
개발과 배포의 기본적인 흐름은 Debug 빌드모드에서 개발, Staging 빌드모드를 통해 코드푸시 배포해서 내부 테스트, 이후 Production 빌드모드를 통해 운영에 코드푸시 배포(서비스 제공)로 가져가는 것이 좋습니다.
코드푸시 배포는 터미널에 다음과 같은 명령어를 입력해 수행할 수 있습니다.
appcenter codepush release-react -a <유저이름>/<앱이름> -d <배포단계이름>각 예시는 아래와 같습니다.
appcenter codepush release-react -a frontDongdong/todo-app-ios -d Staging
appcenter codepush release-react -a frontDongdong/todo-app-ios -d Production
appcenter codepush release-react -a frontDongdong/todo-app-aos -d Staging
appcenter codepush release-react -a frontDongdong/todo-app-aos -d Production
배포상태 확인은 아래 명령어로 가능합니다.
appcenter codepush deployment list -a <유저이름>/<앱이름>또한 일일히 스테이징과 프로덕션의 배포를 따로할 필요 없이 스테이징을 프로덕션으로 승급(Promote)시키고 싶다면 다음 명령어를 이용합니다.
appcenter codepush promote -a <유저이름>/<앱이름> -s Staging -d Production
8. 참고 사항
- xCode에서 프로젝트 workspace 열고 Product > Scheme > Edit Schceme > Build Configuration 변경을 통해 빌드 모드를 바꿀 수 있습니다. 단, Staging 혹은 Release 빌드 후 다시 개발에 들어갈 때, 빌드 모드를 Debug로 돌려두는 것을 잊지 마세요.
- 안드로이드에서 빌드 모드 변경은 yarn react-native run-android --variant=releaseStaging 과 같이 variant 설정을 통해 가능합니다. (이 때 variant 이름은 app/build.gradle 를 참고하세요.)
9. 참고 문서
9-1. SDK 설정
https://learn.microsoft.com/en-us/appcenter/distribution/codepush/rn-get-started
Get Started with the React Native Client SDK - Visual Studio App Center
Getting started with the React Native SDK & CodePush
learn.microsoft.com
https://weiji.io/2021/05/24/react-native-codepush/
React Native 앱, 더 손쉽게 관리하기 - CodePush
앱을 배포하는 과정은 번거롭다. 얼마전에 이미 배포된 앱을 재배포하지 않고 수정할 수 있느냐의 질문이 들어왔었는데… (이미 앱을 설치한 사용자의 화면에 뭔가 새로운 것을 보여주는 일) 불
weiji.io
9-2. 배포상태별 다른 Key 설정
Using the React Native SDK with CodePush – Distribution - Visual Studio App Center
Distribution with React Native SDK and CodePush
learn.microsoft.com
'React Native' 카테고리의 다른 글
| Code Push를 이용한 React Native 인앱 업데이트 Part.1 (1) | 2022.09.22 |
|---|
